
Weblessons.us
| <<= Back | <<= Computer Classes | Next =>> |
In this lesson you will learn:This lesson shows you how to identify and organize your desk shortcuts for Files, Folders, Disk Drives and Printers. In fact, these techniques work for any shortcut on any Windows computer. You will also learn how to organize your shortcuts in folders, how to customize the properties of program shortcuts, and how to repair program shortcuts that have failed to work as expected. Organize Shortcuts on your DesktopThe desktop is a great place to put shortcuts to programs you access often, but placing a lot of shortcuts on your desktop can make it very cluttered and confusing. One way to avoid clutter is to place folders on the desktop and then move different shortcuts and objects inside of the folders. The advantage of putting shortcut folders on the desktop is that you can organize programs and information the way you want, and you don't need to rummage through other folders in Windows Explorer or 'Computer' (or 'My Computer') to find the information. You can create temporary folders to store shortcuts for short-term projects. The shortcuts will be available in the folder until you finish the project. When the project is done, delete the folder and shortcuts to de-clutter the desktop. The disadvantage of placing too many shortcut folders on the desktop is that it is harder to see what is available at a glance, and it is harder to remember which folder the program is in that you need. In that case you would have to open each folder until you find what you are looking for. Placing Shortcuts into FoldersIf you're going to store files in a desktop folder give the folder a name that shows what is in it! You might also create shortcuts in another folder for the programs you use to create those files. Then you can just open the folder and start programs you need and open files all at once. When you become more proficient with the Windows environment, you can delete the shortcuts that are no longer needed. Using the 'Start' >> All Programs is better because there is usually more to the program than just the program itself. Each program may have help documentation, uninstall or other tools associated with the program. These will all be visible from the All Programs menu, but not from your shortcut! Remember that you can create multiple shortcuts to the same program and assign different startup settings to each. This works really well for printers, one set for color and the other for black. There are lots of times you may want to do this. This section shows you how to change the properties of program shortcuts so that you can specify exactly which folder you want the program to save files to by default. Time to review the different ways for creating a program shortcut within a folder.
(If you don't have one, create one in My Documents > Students > Your Name ) The Shortcut Wizard method guides you through the creation process. To create the WordPad shortcut and place it in your 'Personal' Folder, first you have to make sure you are IN the Personal Folder. Then choose File > New > Shortcut. Refer to the section on the Shortcut Wizard for help. Right click the file and drag it onto your Personal Folder. Select 'Create Shortcuts Here'. (hint: You have to tile windows to do this.) Right click the shortcut and choose 'Copy', then right click inside of the Personal Folder and select 'Paste'. If you try each technique you will have a feel for how to do it first time every time. After you experiment and find the easiest process for you, repeat the process for Paint and Notepad. A good way of learning is to use a different method for each program shortcut you make. When you are finished with this lesson your Personal folder will contain three shortcuts: NotePad, WordPad and Paint. Arranging ShortcutsAfter adding shortcuts onto the Desktop they can be sorted (arranged) by name. You do that by Right Clicking in the desktop area and selecting one of the 'Sort By' options. A new window opens that shows options for choosing.> It is good practice to choose each one of these options so you learn what they look like Make three shortcuts in your Personal Folder.
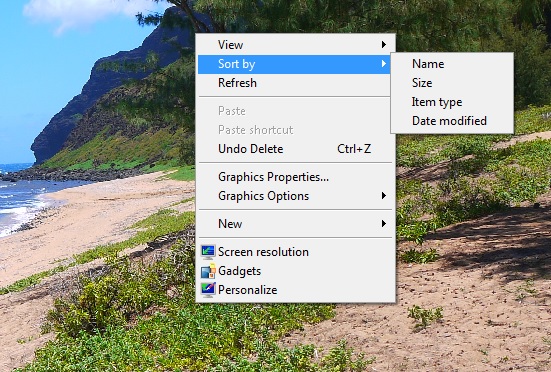
Right click in the desktop area and selecting the 'Sort By' options. Change How You Want Shortcuts to WorkYou can personalize your system even more by changing the properties of the shortcuts. Open your Personal Folder, Right Click the WordPad Shortcut to display the context menu and choose 'Properties'. 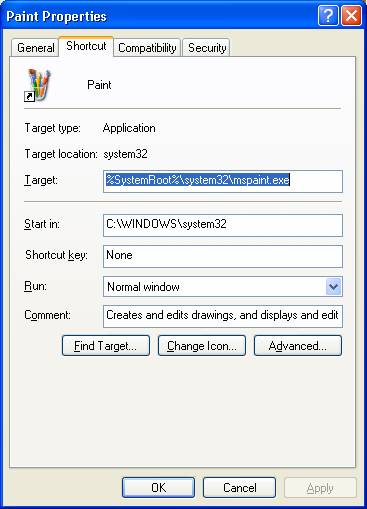
The older systems have this dialog box showing the properties of the shortcut. 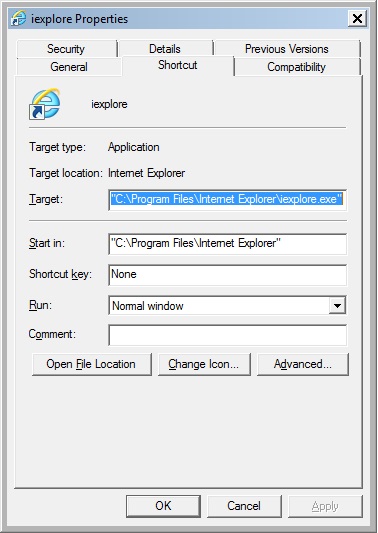
Newer systems have improved options for adjusting the shortcut. 'Open File Location' is the same as 'Find the Target'. Target Location and Target Fields show the folders and filename of the original file the shortcut points to. When shortcuts do not work, simply find the file, note the path in the top of the Explorer Window, copy it ( CTL C) and then paste ( CTL V) the path here. 'Start In' is where this shortcut will automatically open or save files. Click this field and type the path to the Personal Folder you created (Not this shortcut). If you are not sure of the path, open the folder and copy the path from the address bar at the top of the page and paste into this box. When you save files the program will recommend the Personal Folder as the place to save the files. This is where you point the program for saving and opening your files. You can still choose other locations by using the drop down arrow. Also, if a program does not save files, the 'Start In' field can remain empty. 'Shortcut Key' or 'Hot-Keys' is where you can specify a key combination to press that will pop open the program. To specify a key combination like CTL-Alt-W for WordPad, press the Control Key then type W. CTL - Alt is inserted into the field. Note that Alt is automatically inserted for you. You cannot simply specify the Control key plus a letter. Repeat the above for the Paint and Notepad shortcuts, but be careful to use different hot-key combinations Also, if a program does not save files, the 'Start In' field can remain empty. 'Run' is how you want the program to start, either in maximized or normal windows, or as a minimized icon on the Taskbar. Testing the ShortcutTo test a shortcut or diagnose why it is not working follow these steps. Double click the shortcut to make sure that it opens. If it doesn't, right click and check the path. To repair it, open Windows Explorer and find the program it points to, navigate to it and copy the path from the address bar. Paste the path into the Target: field. Double click on the shortcut and open the program. Type a few words and select File > Save As. The Personal Folder should be either listed or opened for you. Type 'Test' in the 'File Name' field. Click 'Save'. Test your Shortcut Key combination to make sure it works. If not, resubmit the keys in the properties page for the shortcut. Your Personal folder should now contain the Test file as well as the three shortcuts. If not, repeat the above steps. Deleting ShortcutsRemoving shortcuts is just as easy as deleting any other object. Either right click and select 'Delete' from the menu, or drag it into the trash bin. This will not remove the program, just the shortcut path to that program. If you do not want the shortcut on your desktop, simply right click and choose 'Delete' from the object menu. Note: Make sure that the Icon has the shortcut arrow in it or else you are actually deleting the object and you will have to restore it from another location. Deleting a Program or System File in this manner can cause serious problems with the Program or the computer! |
NOTE: These are posted for student and staff educational & class use.