
Weblessons.us
| <<= Back | <<= Computer Classes | Next =>> |
In this lesson you will learn:NOTE: This lesson shows where and demonstrates how Windows settings can be changed. This information is for use on your home and business computers. Do not create shortcuts on the lab computers! This lesson shows you how to create shortcuts for personal files, program files, folders, disk drives and printers. You can make shortcuts to any object. You will also learn to use the Shortcut Wizard to give you more power and control of how your shortcut works. Shortcuts in WindowsA shortcut is more than merely a turbocharged 'Pointer'. That is, the 'Pointer' has properties and methods that can be changed. When you create a Desktop shortcut, it appears next to the other objects, and you can put these shortcuts into folders to keep them organized as needed. They provide the quickest way to start a program, open a document, or access a Windows utility, object or other feature. When a shortcut is on the desktop it looks like any other icon for a program. In fact, it is hard to tell the difference. Icons for shortcuts have a down arrow on the lower right side. Whenever you see an icon with the down arrow, it means it is a shortcut to another object. The icon itself will generally give a hint as to what it is for, whether disk or program or a folder. The steps for creating a shortcut are simple:
Right click the shortcut, select 'Rename' and call the object anything you want. It is good to remove the word 'Shortcut' from the name so it takes less space and the name is simpler. 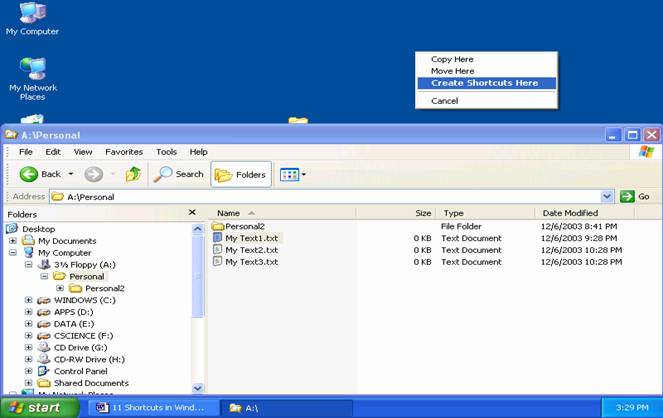
After releasing the right mouse button, use the left mouse button to select 'Create Shortcuts Here'. 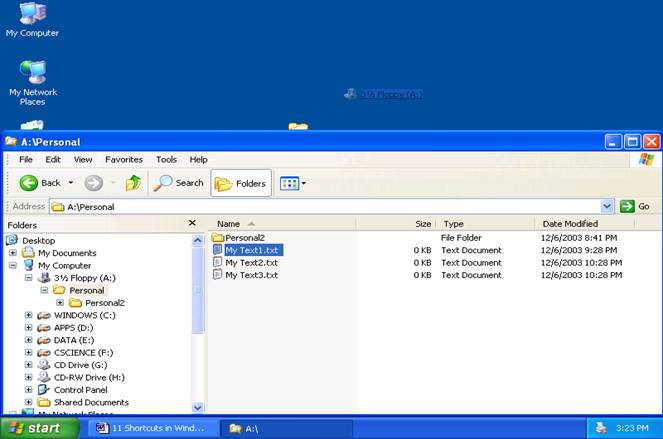
As the mouse is moved there is a shadow or outline of the object as it is being moved onto the desktop In the upper half in the picture above, notice that there is a shadow or outline of the object as it is being moved onto the desktop. As an object is being moved during the Drag and Drop there is always an outline or shadow of the object. This makes it easy to see where you are in relation to where you have to go to drop it. Otherwise, it is easy to 'get lost' as the icon and cursor arrow disappear. If that happens, it means that you may be moving the mouse too fast, so just slow down and the computer will catch up. This is particularly noticeable on older computers. Shortcuts to Personal FilesShortcuts to often used document files on the desktop are real handy tools, saving you the time and frustration of navigating through a folder hierarchy to find what you need each time it is needed. Follow the steps above to create a shortcut to the most often used files, like your résumé, cover letter, or other documents. Consider what you have just done. In a couple of minutes you have just created the absolute fastest way of opening up any file. It is much faster than clicking all of the cascading menus of the Start menu. Creating Shortcuts to an Existing FolderYou'll be accessing files and folders in the Personal Folder throughout your work. Let's create a shortcut to the folder on the desktop.
Any changes you make, like adding or removing files to the shortcut folder, are actually made in the original folder. Placing Program Shortcuts into their own folder is not always advantageous. Clicking more than one time to open a program that you frequently use is counter productive and defeats the purpose of having the shortcut. In this case, folders are not always helpful. Unless you are organizing programs that are not used very often, like utilities, or you need the desktop space, there is very little point in adding another level of access. Creating Shortcuts for Disk DrivesShortcuts can be created and used for hardware devices, as well as for programs. When you create a shortcut to a drive, you can navigate through the Drive folder structure right from the desktop without having to open Windows Explorer or 'Computer' (or 'My Computer') first. If you access a drive often, this shortcut technique will save you time and steps. NOTE: If you create a shortcut to your USB drive or any of it's files or folders, and then click on it when there is no USB drive in the slot, you will get an error. To create a shortcut for any 'Local Disk' follow these steps: The shortcut will be to the 'Local Drive (C:)' drive but works for any device that you want to add. Make SURE you Right click!
Usually called 'Local Disk (C:)'. The picture example is 'Windows C' Now you can access the folder from the desktop. You may want to create other shortcuts at the same time. NOTE: this may not work on the computers in the Computer Lab, but will work at your Personal computer. Shortcuts for Starting ProgramsIf you thought browsing for programs was a lot of work, you're right. We had to open a lot of windows and individual folders simply to find a file and then click it to start the program. The windows cluttered up the Desktop. Wouldn't it be easier to just drag an icon onto the desktop and click on it? Then it would start every time we clicked one time! We can create shortcuts by locating the programs. Let's now do one for the Paint program:
Creating Printer ShortcutsWhen you create a Printer shortcut to a printer on the desktop, you can drag and drop documents that you want to print onto the shortcut and they will print for you. You can change the printer properties by right clicking on the shortcut and selecting 'Properties'. That way you can have one shortcut that will print in color and one that will print in black, one for legal size paper, etc. The procedure for creating the shortcut to a printer is similar to the previous ones for other objects:
There will be an outline of the printer icon during drag and drop. This is an easy shortcut to make and makes printing documents as easy as dropping them onto the shortcut! 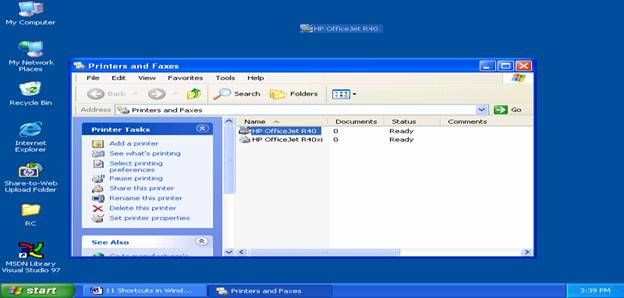
So you have other objects such as programs and documents you want to place on the desktop? Just follow the above procedures for creating shortcuts to them. After you've added the shortcuts to the desktop, it's best to line them up, arrange them by size or the type that they are. This can be done automagically. On the desktop: Right Click > Sort By (or 'Arrange Icons') > By Name, By Type, By Size etc. Shortcut WizardAs you've already learned, one method for placing shortcuts on the Desktop is to open the Window Explorer pane where the object for the shortcut exists, Right Click the object, and drag it to the Desktop. An alternative method is to use the Shortcut Wizard. A Wizard is a helpful program that guides you through the steps for creating a process - a shortcut in this case. With the Shortcut Wizard, you start from the place where you want to create the shortcut, then answer questions asked by the Wizard to create a shortcut in that location. As an example, follow these steps to create a shortcut for the Notepad Program.
The Create Shortcut Wizard appears. If you know the drive, folder and name of the program you want to create a shortcut for, just type it in the 'Location of Item' field. 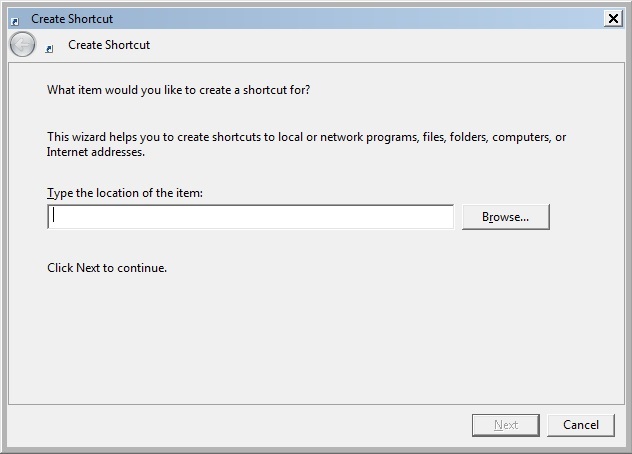
In our example, we don't know, so we have to:
Double clicking will fill in the dialog box for you. You are returned to the Shortcut Wizard where the drive, folder and file you selected will appear in the Location or the item Box. 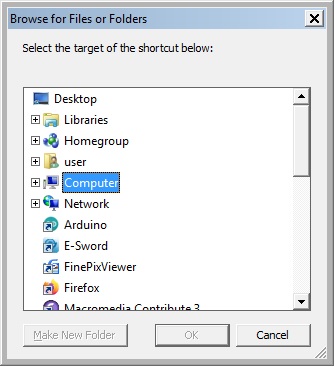
Selecting the 'Browse' button open up a window listing your drives and main folders. Your writing will overwrite the text because when Windows highlights in blue or gray, it means 'Write on me'. So just type over what is there. When you hit the first key, the highlighted text will disappear and your typing will take its place. 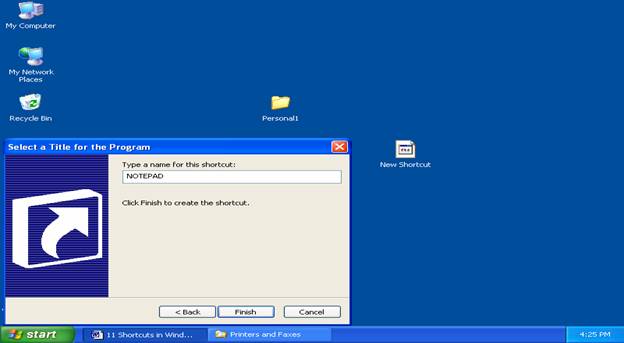
Click 'Finish' to create the shortcut. The shortcut object appears on the desktop and you can double click on the shortcut any time to open the program. Arranging the shortcuts on the Desktop is covered in lesson 35 Organizing Shortcuts.> |
NOTE: These are posted for student and staff educational & class use.