
Weblessons.us
| <<= Back | <<= Computer Classes | Next =>> |
In this lesson you will learn:Read to the bottom: Select 'Checkpoint' and turn it in to your lab instructor. This Lesson explores the Windows file system. It explains how to work with folder windows on the desktop and the Windows Explorer. You will learn to switch between working on the Windows Explorer and with the Desktop so you can see which method is best for you. You'll now work with your personal folders as you copy, move, create shortcuts to, and do other things to folders and files. NOTE: This lesson shows where and demonstrates how Windows settings can be changed. This information is for use on your home and business computers. Do not change settings on Computer Lab Computers. Using the Desktop as a Holding TankAn important concept to notice in the beginning of working with files and folders is that you can place an object on the desktop, not as a shortcut, but as an actual object. Consider how you might use this. The desktop can be thought of as a holding area that is easy to see, a temporary place to put things until you figure out a better place for them to go. Rummaging through a drawer in your desk is a good example: You need a place for general stuff you find on the top of your desk, until later and then you can place all the rummaged stuff into the different areas where they belong. The desktop helps you re-organize your computer the same way. You can gather all the files you need and stuff them into a folder on the Desktop, then move the whole batch to another disk or folder else where. One thing to remember is to not LEAVE the actual file or program on the desktop because Windows loads the Explorer window (the Desktop) with all of the files when starting up. Because of the size difference between a shortcut and the actual file, Windows can take considerable longer to start up and shut down. You will want to create a shortcut to the folder on the desktop, and then open it whenever you need to access the files in it. Shortcuts are discussed in another lesson. NOTE: When you need to access a file often use shortcuts by creating them on the Windows Desktop. (On the Desktop >> Right click >> New >> Shortcut) Two ways of Accessing the File SystemIn Windows the two main means of accessing disk information it through Windows Explorer and 'Computer' (or 'My Computer'). On MAC or Unix the main means of accessing disk information is to click on the disk if it is on the desktop, or use the Finder to access the file system. Each one has advantages depending on the tasks to perform. This particular class covers Windows Explorer. (Internet Explorer is a different program called a web browser for viewing internet files.) About your Computer: Windows ExplorerWindows Explorer is a file management utility that provides you with one of the views of your file system. To open Windows Explorer Right Click the Start Button and select 'Explore'. When opened, it provides 2 panes. The left pane is where the drives and folders are listed. The small arrow ( or plus (+) sign on the left side of the folder signifies other folders inside of the folder or drive. Clicking on the arrow or plus sign will expand the folder or drive. The arrow will turn from pointing right to pointing down, or the + sign will turn to a - sign. Single clicking or double clicking any drive or folder on the left opens it in the right window pane. To see the entire folder contents, you may have to first expand the drive + sign that the folder is on, and then click on the folder on the left side to open the folder you want, which will show the contents of the folder. The files inside will be shown in the right window when you click on the folder in the left window. Starting Windows ExplorerIn this lesson you will see how Windows Explorer can help you. To start Windows Explorer there are a number of ways:
The view that opens starts from the desktop, then your drives, then any network drives, and then the Recycle Bin and any folders you have on the desktop. 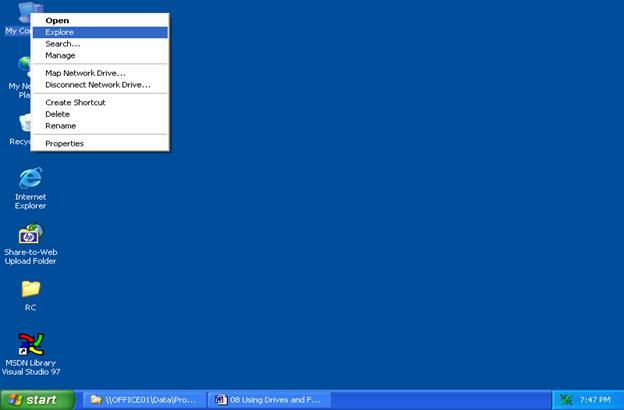
Open Explorer now by right clicking 'Computer' (or 'My Computer') and selecting 'Open'. 
An Explorer window similar to this one opens. ( Computer Lab computers will be different than home PCs.) The choice is yours when you need to open, copy, move, delete or otherwise organize your files. You can work directly with them in Windows Explorer or on the desktop. The main advantage of using the Explorer over the desktop is that you can work with the contents of any window in the right pane and the entire file structure of your computer in the left pane. This makes it easy to copy files on the right to a disk drive or folder on the left. In other words you can see both the source and the destination at the same time. It is not only fast, but it is also very accurate. As a professional this method is the best way to transfer or manipulate files or folders with few mistakes. If a mistake is made you can see where the file went or which action actually happened. You also don't need to open a bunch of separate windows like you do when working on the desktop. If something goes wrong or disappears completely select the 'Edit' Menu and click on 'Undo'. Moving Around Inside Windows ExplorerThere are a few techniques for working with desktop folder windows and the Explorer. Here are some basic steps.
As you'll see in the three steps at the end of this Lesson, you'll begin to appreciate Windows Explorer more as you learn the techniques for copying and moving files. When expanding the folders in the left pane, the list can become very long and you'll need to scroll through it. Collapsing any folders you don't need open will reduce the length of the list. Working Inside Windows ExplorerYou can change how files are listed in Explorer's right pane by choosing options on the View menu or clicking buttons on the toolbar, as explained later in 'different ways to view folders.' The toolbar can be toggled on by selecting it on the View > Toolbars Menu. Working with Explorer is like working with most windows and objects, except that you get a hierarchical view of the filing system. You can right click folders to see their menus and you can click and drag objects from one place to another. The best thing about Explorer is that it makes copying and moving objects between drives and folders easier. For example, if you want to copy a file from a folder on a USB Drive to the 'My Documents' folder or even a folder on a different drive then just follow these steps.
It's that easy!! Checking Drive Space with Windows ExplorerTo review what we've learned, Windows Explore, when opened, provides 2 panes. The left pane is where the drives and folders are listed. To see the entire Drive structure or your computer you have to first open the Computer Icon by clicking on the plus sign (+). Listed below are all of the disk drives on your computer. To check on the drive space, right click on the drive and select 'Properties' Windows Explorer, when open in Windows 2000, will show the disk space automatically. 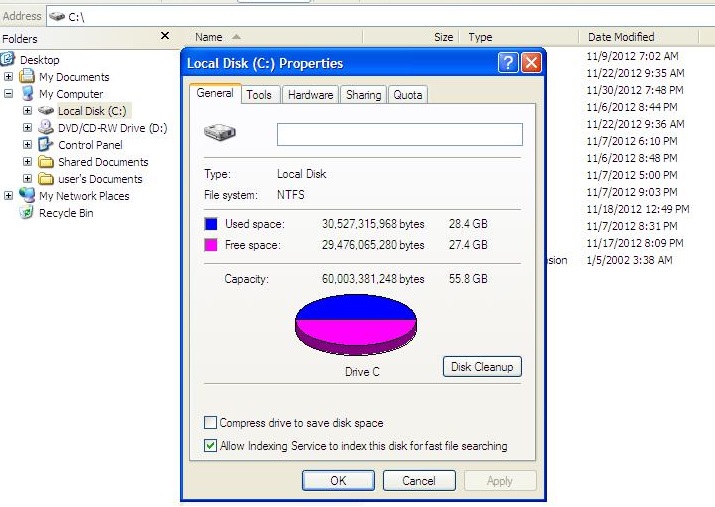
The pie graph shows the size of the drive, the amount of used space and the amount of space still available. It is important to know how much space is left on your drive. If you try to copy or move a file when the disk is full you get an error message. Thankfully the operating system will alert if the selected files are more than the disk space allows but there are exceptions. So what happens when you copy multiple files and the operation fails suddenly with a 'Disk Full ' message! What to do? Are the files that were in process suddenly gone because they were 'halfway' and deleted from the source but no room on the destination? The answer is that it depends on the type of drive: hard drive, CD / DVD, USB or SD Cards. For a USB or Floppy Drive (A:) the answer is no. By examining the message, you see that there is an option to continue. Simply remove the full media and insert another of the same type and press 'Continue'. Modern Operating Systems handle things gracefully and warn you with a Dialog Box that informs you that the disk space is getting low. As the disk fills to where there is less than the threshold of space left, a dialog box on the lower right (in the Taskbar) warns that space is getting low. There are three warnings, and the fourth is a STOP!! When using SD card or USB drives there may be no warning until the drive is full. Then a message will prompt for a retry, giving time to remove the drive from the computer and move the files to another computer or remove files through disk management (covered later). You then can put the drive media back and select the option to 'Retry', which will continue the operation where it left off. 'Computer' (or 'My Computer')As mentioned at the beginning of the lesson, both Windows Explorer and 'Computer' (or 'My Computer') are Folder, Drive and file management utilities that provide you with views of your file system. We will now look at 'Computer' (or 'My Computer') more closely. |
NOTE: These are posted for student and staff educational & class use.