
Weblessons.us
| <<= Back | <<= Computer Classes | Next =>> |
In this lesson you will learn:NOTE: This lesson shows where and demonstrates how Windows Taskbar settings can be changed. This information is for use on your home and business computers and is for instructional purposes only. Do not change any settings on the School Computers! Maximized means that the window is at it's maximum size and cannot grow larger: it takes up the entire viewing area to the borders of the screen. Minimized means that the window has shrunk to a portion of the original size, but still remains on the screen and can be seen in a smaller size than the maximized window. Minimized to the Taskbar means that the window is reduced to an Icon on the Taskbar and cannot be seen in the viewing area at all. The Windows Taskbar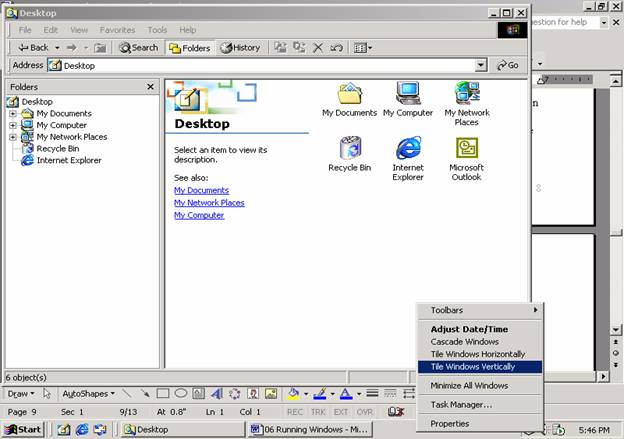
The Taskbar is the bar on the bottom of the window. In the picture you can see that the 'Desktop' and Word Program are running on the Taskbar. It contains words and icons across the bottom of the screen and includes the area from the Start button on the left side to the time clock on the right side. The Taskbar lets you perform tasks on the open windows, shows which programs are open and is adjustable to different sizes. Taskbar PropertiesYou can change the properties of the Windows Taskbar by Right Clicking the Taskbar, and from the menu choose the function you want. The most important of these is called 'Properties'. The Start Button Programs, the Taskbar Options, and the type and size of the Icons to show are some of the features that can be customized to meet your needs. 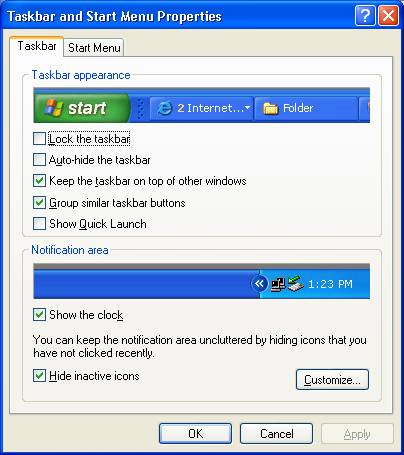
The Taskbar Properties Window Taskbar properties include:
For beginning computer users this is an important feature to have turned on. The 'Quick Launch' option is something that turned out to be so useful that it has been taken from the Taskbar and moved to the top of running programs. The Quick Launch shows the most useful tasks that can be accessed by a quick touch of the toolbar. You should customize the Quick Launch Tool Bar so that the most useful tasks are listed and the unused ones removed. At the top of the screen right click and select 'Quick Launch' and customize it according to your needs. You should experiment with 'Auto Hide' and 'Always on Top' features whenever you see that they are an option. For beginning users, I suggest keeping the ‘Always on Top’ enabled and the ‘Auto Hide’ disabled until feeling more comfortable about how the Windows system works. Otherwise the Start Button and Taskbar disappear! Though it gives a larger desktop work area, can be a problem for those who don't understand the feature, but see the buttons are all gone! The Start Menu Tab is studied in another lesson. Switching between Open Windows and MultitaskingWhen several windows are open on the desktop, the icons for the open programs are in the Taskbar. You can switch between the open programs using ALT-TAB. The ALT-TAB key combination pops open a little window with the running applications represented as icons. By pressing ALT-TAB repeatedly, you can cycle between the open programs. When two programs are open, they appear together, so pressing ALT-TAB again takes you to the most used. For example: Create and open three documents, Doc 1, Doc 2, and Doc 3 as if you were going to copy and paste information. ALT-TAB shows all three are open in the order that they were originally opened. It is easy to copy something from Doc 2 into Doc 1, or copy a paragraph from Doc 3 into Doc 1, then another paragraph from Doc 3 again etc. By using ALT-TAB, the files can be popped open very quickly, rather than reaching for the mouse. You will perform this later in the lesson on files. Tile and Cascade Windows for ViewingIn some cases, however, you'll want to arrange the desktop so you can see all the windows at the same time. When windows are placed side by side, you can either compare contents or drag and drop to copy information. This is called Tiling and Cascading Windows. There are two ways to organize windows so you can see all of them. You can manually resize them and move them using the techniques already described, or you can have Windows automatically resize and arrange them for you. To see how this works with two open Microsoft programs, like Word and Paint.
You should have three programs open, this page, Word and Paint 
With two programs open on the Taskbar, right click and open a third program. Right Click a blank area of the Taskbar to display the object menu. Yours may look slightly different Choosing 'Cascade' from the menu list will arrange the open windows on top of each other in a cascaded arrangement. The cascade arrangement lets you quickly see the title bars and get to the window you want to work with. Another trick is to click the 'Maximize' button (or double click the title bar) of the window you want to work with and then work in the maximized window. When you're done, click the 'Restore' (middle) button to restore the original Cascade arrangement.
The 'Tile Horizontally' arrangement is good for comparing paragraphs of text or listings of files.
the 'Tile Vertically' arrangement is useful when copying or moving files from one window to another. You will use this skill later in the Files lesson.
The Cascade and the two 'Tile' options change the size of the windows. You have to manually resize the borders of the windows if you want to return them to the customized size you previously set. |
NOTE: These are posted for student and staff educational & class use.